Showing posts with label printing. Show all posts

Thursday, July 2, 2015

Encaustic Painting Process, Draw-Through Printing and Tissue Paper


Kiss (detail)
encaustic, paper and ink on birch
Trying old techniques in a new way again - this time a printing technique called draw-through printing.  Keeping things fresh and loose in art can sometimes be a challenge for me.  This little chickadee is a detail from a larger modular painting.  I've been revisiting some techniques I learned a while back and finding it really fun.  Thanks to the wonderful Stephanie Hargrave for being the inspiration. 

The drawings are done on tissue paper and then put into the encaustic painting.  Its a fun process and because of its nature, it keeps the drawings loose and fresh.  The first step is to get together all the things needed
  1. printing ink - I used Akua, but there are other printing inks that work great like Daniel Smith printing inks. 
  2. Glass palette
  3. brayer
  4. bamboo skewer
  5. tissue paper

Step One - roll out the ink with the brayer - can't stress enough that it needs to be a thin layer. Think thin to win!
Step Two - gently place the tissue paper on top of the rolled out ink and weight the edges so it will not move when you do your drawings.
Step Three - Use the bamboo skewer, or end of a paint brush handle or even your finger nail - and draw.  Being careful not to touch the paper to hold it otherwise you will have finger prints which is ok, but just be mindful where they are.  You will see your line showing through the tissue as you draw your shapes. 
 
 
Step Four - carefully peel up the tissue from the printing plate and turn it over.  You will see your designs printed on the tissue. 

You can see in this photo the "noise" created in the print where the tissue stuck to the ink other than where the lines were drawn.  I don't mind a little bit of noise in the print.  A lot of noise creates a whole another look to the print.

Step Five - once the prints are dry - burnish the tissue into an encaustic painting and gently heat.  The white tissue will magically disappear into the wax and will leave only the printed lines showing.  Cover with a protective layer of wax and the tissue will totally blend into the artwork
 
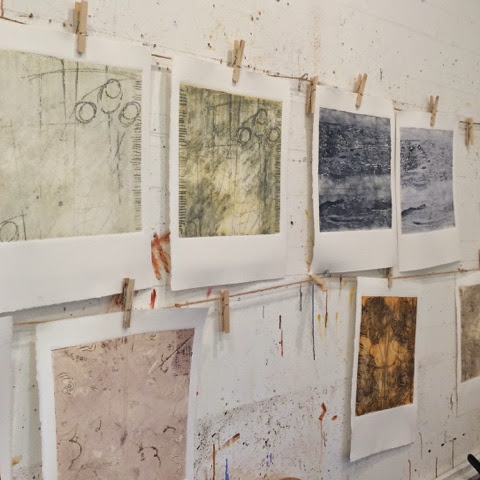
 Noisy print on the left and only just a little noise on the right
As a side note, I did find that the tissue I was using had a shiny or hard side and a matte or soft side.  I found the hard side would stick to the ink in places that I really didn't want it to, thus, creating "noise" in the print like on the left above.  The soft side of the tissue would allow for the fine lines to show through without too much stickage (noise). I would re-brayer the inked area after every print, not necessarily adding more ink until I really needed it.  Its fun to do several when you have everything out - lots of different shapes and designs.  That way when you are ready to put the drawings into your artwork, there are lots of choices to layer and have fun with.  I'm also assuming it would work with a gel medium on an art journal page or other artwork than encaustic. 
Good luck and have fun.  Happy Friday everyone!


Thursday, February 12, 2015

Encaustic Collagraph with Monotype, Print Making and Fish


encaustic collagraph
I spent my morning in the print studio inking and printing the encaustic collagraph plates that I had prepared in my home studio.  I had my first "yay" moment with encaustic collagraph, today. I've been trying to figure out what works and what doesn't work.  Frankly, I've had a lot of disappointments in the print shop.  I was feeling like the school girl crush had run its course and I was moving on to the next star struck love of my life.  And, then today came together and now I'm back in love with printing making again.    


encaustic collagraph monotype
10x10
There were 5 plates involved in these two prints.  One with the lines that are scratched into the plexi glass, two collagraph plates made with wax and two monotype plates that were the background fish.  I tend to be a bit of an eager artist, so print making is a challenge for me.  Slowing down, precision and attention to detail take a lot of concentration for this mere mortal.    


encaustic collagraph with monotype
10x10

I had some rooky mistakes and honestly my knowledge of printmaking is so very shallow that I only know enough to be dangerous.  But, I am looking forward to taking the waxed plates back to the print studio and trying another pass at all this with what I learned today.  The good news or the bad news is that I won't be able to make them the same - maybe kind of, but not the same.  That's the joy and adventure of monotype - only one.   Happy Friday everyone!

encaustic collagraph plates ready for ink
and the monotype plates ready to go


Thursday, December 11, 2014

Linocut Christmas Cards, Printing for Fun and Sharing Art


Printed and Drying
Christmas Card Linocuts
Love linocut!  What better way to say Merry Christmas than to share art with a handmade Christmas card.  I have been a little slack on sending out cards in the past few years, but this year, I've changed it up.  Seems I've been bitten by the printing bug in a number of ways and its been taking up lots of creative space in my brain.

Inking Up
This past weekend, I spent Saturday and Sunday making and printing more encaustic collograph prints.  This time in the studio of Elise Wagner.  Printing is such a brain teaser for me - I love the mental gymnastics workout that it gives me.  Thinking in reverse, positive and negative space and of course throwing in the fundamentals of composition just to keep things exciting.


Artist Proofs
 
I love the graphic nature of the linocut.  The designs can be complex or simple - but the contrast is what is the tell all if it works or not.  Good things happening here and I'm super proud - I only cut my fingers twice :) 

Mounted on cards and ready to send


Now I just have to get these addressed and out in the mail.  Happy Holidays and Merry Christmas!  And, Happy Friday everyone!


Tuesday, December 9, 2014

Encaustic Collograph with Elise Wagner


Akua Intaglio Inks
nontoxic soy and honey based inks
Encaustic collograph printing...  can't seem to get enough of it.  I joined Elise Wagner in her Portland studio for her encaustic collograph printing class.  Elise is the mastermind behind using encaustic wax for collograph printing.  She's been experimenting with it for over 7 years, bringing it from an idea in her mind to where it is now - an emerging art form.

Prints Drying
A couple of times, a year she opens her studio for a workshop in combining wax and printing.  The rest of the year, she offers the classes around the country and in 2015 there will be a big event at R&F Paints in New York in August.

Inking Plates for the press
I took my first class in encaustic collograph at Atelier Meridian in November.  I was totally hooked and now even more so.  Learning from the printmaker's side to begin with and now more information from the encaustic painter's side providing me with a combination of perspectives. 
 
Encaustic collograph print
I'm very anxious to try and try again at this new endeavor, which means lots of trial and error as I make my way along the learning curve.  However, the holidays are bringing a rest from the studio and all the excitement and information rolling around in my brain.  It will all simmer away in the back of my mind, slowly cooking up some thing that will surprise me in the new year. 


Related Posts Plugin for WordPress, Blogger...